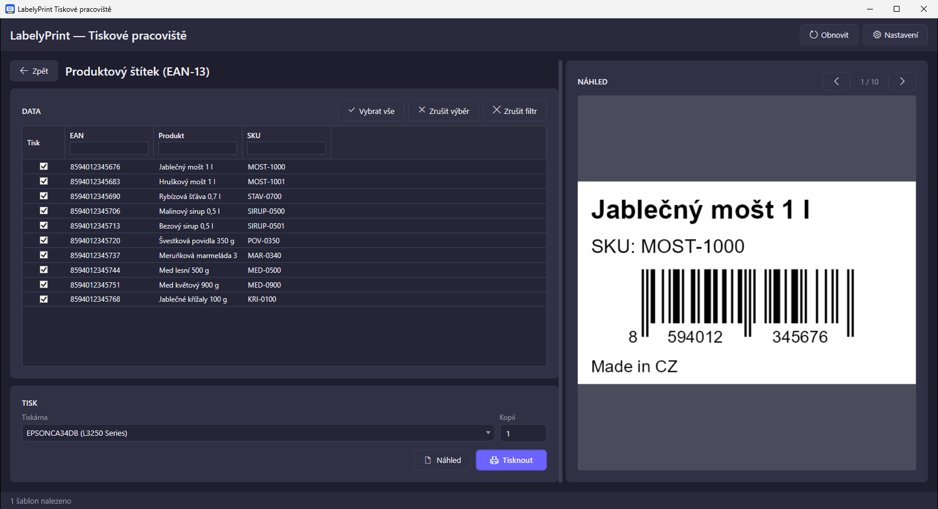
LabelyPrint consists of two apps. In the Designer you design labels, in the Print Station they get printed. The Print Station has no editor and no menu to click further into, so a template cannot be broken by accident. The operator sees only finished templates, picks the right one, fills in the data and prints.
Templates are loaded from a folder you choose in the settings – typically a shared network drive where you save them from the Designer. Each template has a tile with a preview and the label size, with a search box above. The station settings can be locked with a password.
Classic printing: template, data, Print
Clicking a tile opens the print screen. On the left is what the operator fills in, on the right a live preview of the label exactly as it will come out of the printer.
- Variable fields – batch, date, weight and the like are typed by the operator or read by a barcode scanner straight into the field.
- Printing from data – when the template is connected to Excel, CSV or a database, a record table is shown. Every column has its own filter; Select all, Clear selection and Clear filter work on the whole table. One label is printed for each ticked row.
- Preview of every row – arrows in the preview step through the selected records so you can see each label.
- Printer and copies – a template remembers its printer and the station pre-selects it; the station can also have a fixed printer.
What is new in classic printing in version 1.0.7:
- Speed – selecting all rows and filtering happen instantly even in files with hundreds or thousands of records.
- Column widths can be dragged; the checkbox column has a fixed width.
- Preview in its own window – clicking the preview opens the label enlarged to fit the window.
- Remembered layout – the split between the table and the preview stays as you set it, even after a restart.
- Clearer settings split into General, Print, Data, Scanning and Security sections. Picking a data file loads its columns automatically, and missing required values are highlighted.
- Icons on buttons for quicker orientation.
New: scan a code, get the label
Scan mode is made for places where a label is printed for a specific product: dispatch and packing, goods receipt, a production line. The operator does not look for a template or a table row – a scanner is all it takes.
- The operator scans the product barcode, for example an EAN.
- The station finds the matching record in the data and shows the label preview with the values filled in.
- The operator confirms the quantity with Enter and the label is printed.
The station is ready for the next scan straight away. Scanning uses the same data source the station has set up for regular printing.
- Template, quantity and printer from the data – each product can have its own template or printer in a table column, and the same goes for the quantity. Otherwise one template applies to all and the operator enters the quantity.
- Record table on screen – the table filters as you type a code, and rows can also be picked by hand. The search result stays filtered until you print.
- Typo protection – a maximum quantity per scan stops 1000 labels being printed instead of 10.
- Straight into scan mode – the station can open the scan screen on startup.
Where you will use the Print Station
- Warehouse and dispatch – pallet, box and shelf labels from ERP data.
- Production – a product label on the line after scanning its code, with batch and date.
- Retail – price tags and product labels from a price list in Excel.
- Lab and office – sample labels or asset tags.
Getting started
Version 1.0.7 is ready to download, and installed copies will offer the update by themselves. Setup steps are in the documentation, an overview of all features on the Features page. You can download the new version and try it free for 14 days.
Prepare templates in the Designer, save them to a shared folder and the Print Station offers them to the operators – no extra training and no risk of a template being changed.